Woven dress print placement determines how a floral, stripe, check or engineered motif appears across the finished garment. The same fabric can produce a polished dress or an inconsistent one depending on pattern direction, cutting rules and seam matching. Buyers should define the visual priorities before marker making because precise placement can increase fabric consumption and cutting time.
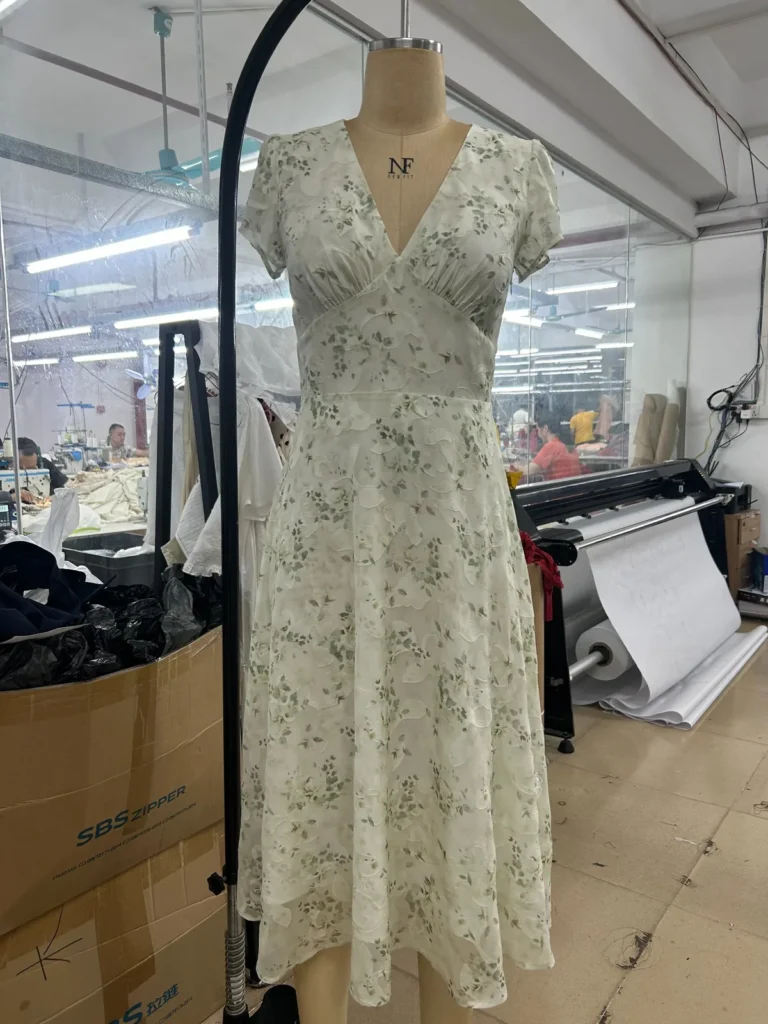
Identify the print type before setting rules
A tossed floral with no obvious direction allows more pattern rotation than a one-way print. Stripes and checks create clear horizontal and vertical reference lines. Border prints, panels and placement graphics may require each garment piece to sit at a specific position within the fabric repeat.
The fabric specification should state repeat size, usable width and print direction. Buyers should also approve the physical bulk or strike-off through the private label color approval process before finalizing placement decisions.
One-way versus two-way cutting
Two-way cutting allows pattern pieces to rotate 180 degrees when the print and fabric surface permit it. This can improve marker efficiency. One-way cutting keeps every piece in the same direction and is necessary for obvious motifs, directional surfaces or designs where upside-down flowers, words or objects would be unacceptable.
The buyer and manufacturer should agree on the rule before quoting. A consumption estimate based on two-way cutting will be inaccurate if the approved garment later requires one-way placement.
Define which seams need matching
Exact print matching at every seam may be technically possible but commercially unnecessary. Buyers should prioritize the most visible areas and state them in the tech pack. Common matching points include:
- Center-front and center-back seams
- Patch pockets against the body panel
- Plackets and front openings
- Waist seams between bodice and skirt
- Side seams on horizontal stripes
- Collars, cuffs or yokes with deliberate motif placement
Curved seams, darts, gathers and shaped panels naturally interrupt a print. The approved sample should show the acceptable visual result rather than demand impossible continuity.
Control focal motifs on the body
Large flowers, medallions and high-contrast shapes can fall awkwardly at the bust, seat, crotch or seam line. Pattern technicians may shift pieces within the repeat to place focal motifs more intentionally. The buyer should identify unacceptable zones and any preferred center-front position.
For asymmetric prints, each garment may vary unless placement is controlled. If the brand expects every unit to look nearly identical, that requirement must be stated because it can increase fabric use significantly.
Review stripe and check alignment
Horizontal stripes should appear balanced across the garment and should not slope due to fabric skew or inaccurate cutting. Checks may require alignment at major seams, pockets or plackets. Sleeve-to-body matching depends on armhole shape and may only be achievable at selected reference points.
Incoming fabric inspection should check bow and skew before cutting. The guide to women’s clothing manufacturer fabric inspection explains how distorted prints and off-grain material can compromise placement even when the pattern is correct.
Consider gathers, pleats and panel seams
Gathers compress the print and can create dark visual bands where motifs accumulate. Pleats hide and reveal different parts of the design as the garment moves. Tiered skirts divide the print into horizontal sections, while princess seams can fragment large motifs.
Sample review should evaluate the complete silhouette on a dress form or model. A flat pattern image cannot fully predict how the print appears after gathering, draping and sewing.
How print placement affects consumption
Matching and engineered placement limit how tightly pattern pieces can nest in the marker. Additional length may be required to reach the next repeat or keep motifs consistent between sizes. The fabric consumption guide explains how direction, usable width and size ratio influence garment cost.
For a low-MOQ collection, brands can control cost by identifying a few high-value matching points instead of demanding exact matching everywhere. The quotation should clarify whether print matching allowance is included.
Approve placement at the right sample stage
The fit sample may use substitute fabric, so it cannot serve as final print-placement approval. Once the actual fabric is available, the factory can make a size-set or pre-production sample showing direction, motif position and seam matching. Comments should distinguish required corrections from acceptable natural variation.
Production and inspection controls
- Mark print direction on patterns and markers.
- Identify matching notches and focal placement points.
- Control shade and print lots during spreading.
- Bundle cut panels without mixing positions or lots.
- Show operators the approved sample.
- Check priority seams during in-line and final inspection.
The woven dress bulk-production guide can help buyers connect print approval with fabric, pattern and production controls.
Turn a visual expectation into a measurable instruction
Woven dress print placement works best when the tech pack states direction, focal zones, matching priorities and acceptable variation. Brands should review the rule with the expected fabric consumption and approve a sample made in the actual print. Buyers developing floral, striped or panel-print dresses can send their artwork, repeat and design sketch for a placement review before bulk cutting.